In this article we will explore how to configure VLAN QinQ (802.1ad) on Enterprise SONiC. QinQ allows service providers to encapsulate customer VLAN traffic (C-VLAN) inside provider VLANs (S-VLAN), enabling multiple customers to use overlapping VLAN IDs while maintaining separation.
We will cover:
- Creating service (S-VLAN) and customer (C-VLAN)
- Configuring QinQ on interfaces
- Verification
Creating Customer-VLAN and Service-VLAN
First we create both service and customer VLANs.
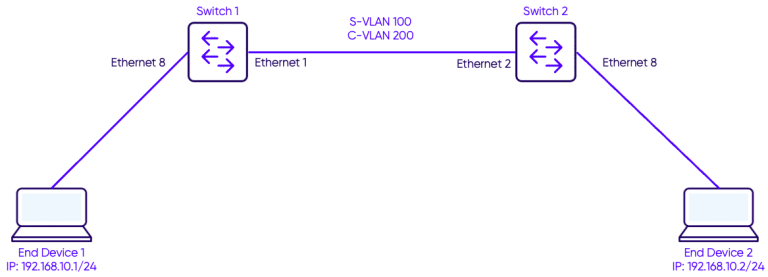
On Switch-1
Switch-1# configure terminal
Switch-1(config)# vlan 100
Switch-1(config)# vlan 200
On Switch-2
Switch-2# configure terminal
Switch-2(config)# vlan 100
Switch-2(config)# vlan 200
- VLAN 100 → Service VLAN (S-VLAN)
- VLAN 200 → Customer VLAN (C-VLAN)
Configuring QinQ on interfaces
Enable QinQ by assigning customer VLANs to service VLANs.
On Switch-1
Switch-1(config)# interface Ethernet 1
Switch-1(conf-if)# switchport mode dot1q-tunnel
Switch-1(conf-if)# switchport access vlan 100
On Switch-2
Switch-2(config)# interface Ethernet 2
Switch-2(conf-if)# switchport mode dot1q-tunnel
Switch-2(conf-if)# switchport access vlan 100
Assign customer-facing interfaces:
On Switch-1
Switch-1(config)# interface Ethernet 8
Switch-1(conf-if)# switchport access vlan 200
On Switch-2
Switch-2(config)# interface Ethernet 8
Switch-2(conf-if)# switchport access vlan 200
Verification
Use the show Vlan and show interface commands to verify QinQ configuration
Switch-1# show vlan
Q: A - Access (Untagged), T - Tagged
NUM Status Q Ports Autostate Dynamic
100 Active T Eth1  Enable    No
200 Active A Eth8  Enable    No
Check tunneling configuration:
sonic# show dot1q-tunnel
Interface    Mode            VLAN
Eth1         dot1q-tunnel    100
Notes
- QinQ enables VLAN stacking, useful in carrier and multi-tenant environments.
- The outer tag (S-VLAN) is used by the provider, while the inner tag (C-VLAN) identifies customer traffic.
- Make sure both provider and customer VLANs are properly configured and consistent on both ends.
- Always veirfy using
show vlanandshow dot1-qtunnel.